Charles Flower’s Old London Churches

St Helen, Bishopsgate by Charles Flower, c.1904

I came across the above picture of the church St Helen, Bishopsgate on an old postcard recently. It caught my eye because I pass through this scene almost every day and find it a rare haven of tranquillity amongst the bustle of the City traffic.

The picture forms part of a set of six postcards featuring Old London Churches, produced by the great postcard publishers Raphael Tuck & Co in 1904 and all painted by the same artist, Charles Flower. This was the golden age of the picture postcard and hundreds of thousands of Tuck’s cards were manufactured and sent every year.

Charles Flower in his early twenties

Charles Flower

Charles Edwin Flower (1871-1951) was one of Tuck’s most prolific artists and contributed around 300 paintings over a long career. He travelled widely, with the scenes he captured covering the USA, Canada, Germany and Argentina as well as the breadth of the UK. The ubiquity of Tuck’s postcards must have made Flower’s work some of the most recognised of the early 20th century. Despite this, we know relatively little of him beyond that, prior to working for Tuck, he was employed as an artist by the pioneering archaeologist Augustus Pitt Rivers to illustrate a catalogue of the vast number of finds from excavations on Pitt Rivers’ Wiltshire estate. I’ll say more about Flower in a future post.

Having tracked down all six postcards in the set, I was delighted to see that all six churches are still with us today. This is quite something, given that two (All Hallows-by-the-Tower and St Olave, Hart Street) were almost destroyed during the Blitz and a further two (St Helen’s and St Ethelburga, Bishopsgate) were blown up by IRA bombs in the early1990s. So I thought it would be good to recreate Charles Flower’s images as they appear today. All six views are plainly recognisable. The most noticeable change to the churches is the new and very different steeple added to All Hallows-by-the-Tower on its rebuilding after the second world war. Comparing old and new images also highlights the photo-bombing of these views by the City’s ever-growing plague of office towers.

St Helen, Bishopsgate as it is today

St Ethelburga, Bishopsgate by Charles Flower, c.1904

St Ethelburga, Bishopsgate as it is today.

All Hallows-by-the-Tower, by Charles Flower c.1904

All Hallows-by-the-Tower as it is today

St Olave, Hart Street by Charles Flower c.1904

St Olave, Hart Street as it is today

St Bartholomew-the-Great by Charles Flower c.1904

St Bartholomew-the-Great as it is today

St Magnus-the-Martyr by Charles Flower c.1904

St Magnus-the-Martyr as it is today

Further Reading

If you enjoyed this post, you might like these other pieces on the City of London’s churches:

Poppies and Pepys and Ghastly Grim

Fishwives and Firestarters: a Load of Old Billingsgate

Magnus, the Monument and Mice Eating Cheese

City of London Churches – Digital Sketches

Magnus, the Monument and Mice Eating Cheese

IMG_5498

This is the third in a series of posts I have called City of London Steeplechases, virtual guided walks of each of the City’s Wards, seeking out the sites of all the churches, past and present and many other points of interest along the way.

Previous Steeplechases have covered the Tower and Billingsgate Wards. Continuing westwards along the Thames, we now come to the Ward of Bridge and Bridge Without, comprising London Bridge and a narrow band around its northern approach, covering the area around The Monument and spreading north up Gracechurch Street as far as its junction with Lombard and Fenchurch Streets. 

Bridge Without what?

The ward’s name is confusing to say the least and takes some explaining. 

IMG_5499

Until 1550 Bridge Ward occupied broadly its current boundaries but in that year the new ward of Bridge Without (ie without, or outside, the City walls) was created to reflect the City’s jurisdiction over three manors in Southwark to the south of the bridge.  By 1899 the administrative government of the Southwark parts had become removed from the City of London’s responsibilities, but the City retained the right to appoint an Alderman. In 1978 the two wards were merged together and, at least officially, are still known as the Ward of Bridge and Bridge Without – despite the fact that the ‘real’ ward boundaries are all ‘Within’ the old City Wall and the ‘Bridge Without’ element is nominal only.

Walking Bridge Ward

Starting from London Bridge station, leave the station into Tooley Street and head onto the bridge, keeping to the right hand (eastward) side. Note the large dragon on its pedestal guarding the entrance to the City of London.

IMG_5447

Similar statues stand sentinel over most of the City’s entrance roads. As explained in an earlier post, the dragon has been an important symbol of the City for centuries and is a fundamental  component of the City’s heraldry: look closely at any modern City street sign or roadside bollard and you will see what I mean:

IMG_5510

Stop half way across London Bridge and admire the views of the City and downriver. It’s worth reflecting that there have been a succession of bridges here for almost 2,000 years dating back to Roman times. The current bridge is a relatively modern affair dating back only to 1967 when its predecessor, unable to stand the weight of traffic, was dismantled and shipped off to the USA where it was reassembled at Lake Havasu City in Arizona. That bridge, opened in 1831, had itself replaced the famous medieval London Bridge with its houses, shops and traitors’ heads upon spikes.

The medieval bridge stood some way downstream of its successors, and was aligned with the porch of St Magnus Martyr which bestrode the northern approach, as illustrated by the image below from around 1800 (note that the houses and other buildings on the bridge had been demolished around 1760). The map, from 1830, shows that the medieval and 19th century bridges briefly co-existed.

IMG_5506


IMG_5505

As you reach the northern bank, look down again over the wall and notice how the riverside walkway juts out immediately downstream of the bridge. This area was on the upstream side of the medieval bridge and was the site of the famous water works by which the City’s drinking water was pumped up to the Standard at the top of Cornhill. Fans of Rob Lloyd’s Restoration London thriller The Bloodless Boy (my favourite London book of 2014, reviewed here) will recall this spot! 


IMG_5508

As the bridge meets the northern bank you will see some rather unpromisingly dank steps down to the riverside walkway. Descend these and head upstream under the bridge.

IMG_5509

As you re-emerge into daylight note the imposing Fishmongers’ Hall to your right, dating from 1835 and the 3rd hall on the site. As you pass the hall you will see a pair of Coade Stone statues of a fishmonger and fishwife.

IMG_5521


IMG_5522

IMG_5516


Continue along the riverside walkway until you reach Swan Lane. Turn right: this is the western boundary of Bridge Ward. Now lined with modern offices,  it is hard to imagine this lane dates back at least to the 12th century. Originally known as Ebbgate, it was renamed after the Old Swan Inn that stood here. Samuel Pepys described eating there in 1660 as ‘a poor house and ill-dressed, but very good fish and plenty’. The Old Swan was also the start point for Doggett’s Coat & Badge race. As you turn the corner look up high on your right for a small sign showing that the property belongs to the Fishmongers’ Company.

IMG_5614

Continue along Swan Lane and cross Upper Thames Street. Keep to the left of the large building site and pass up Arthur Street which curves up to the right and returns to the bridge approach. From this side of the bridge notice the bulk of Adelaide House across the road and scandalously blocking the view of Wren’s beautiful St Magnus, built to stand sentinel over the bridge’s northern approach.

IMG_5528

Now re-cross the busy junction to the eastern side of the bridge approach. Before the bridge was moved, this was part of Eastcheap, the east chepe or market so named to distinguish it from West Cheap (now Cheapside). As you turn right into Eastcheap look for the blue plaque marking the site of St Leonard’s Eastcheap, one of the many churches lost in the Great Fire and not rebuilt.

IMG_5529

Cross Eastcheap and head north up Gracechurch Street, looking out for the marks showing the boundary between the parish of St Leonard’s and that of St Benet Gracechurch. Gracechurch meant ‘Grass Church’ or ‘church near the herb market’ that was held on this street.

IMG_5531

A little further on, take a little detour down Talbot Court to the right where you will find The Ship Inn, an interesting old pub. Outside, across the passageway you will see further parish boundary marks, this time delineating St Benet’s from the parish of St Andrew Hubbard (see our Billingsgate post).

IMG_5533

Retrace your steps to Gracechurch Street and continue northwards. [by the way, if you want to see further parish boundaries there are two more sets, separating St Benet’s from All Hallows Lombard Street, one across the road on the corner of Lombard Court and a further set along the Court itself].

IMG_5537

A little further up Gracechurch Street, you will pass St Benet’s Place and then, just before you come to the Boots chemists on the corner of Fenchurch Street you should see another blue plaque, this time marking the site of St Benet  Gracechurch. St Benet’s stood on what is now the roadside junction before being demolished for road widening in 1867 (not 1876 as stated on the blue plaque!).

There have been three catastrophic periods in the history of City of London’s churches.  Everyone knows about the Great Fire and the Blitz, but few appreciate that between 1781 and 1939, 27 City churches, including 20 by Wren, were demolished mostly as part of a series of metropolitan improvements that would (hopefully) be unthinkable today. One of the greatest losses was St Benet’s, as is evident from the pictures below.
IMG_5539


IMG_5544
IMG_5538
IMG_5553

IMG_5554
IMG_5551

As far as I can identify, the only tangible remnants of St Benet’s are its fine pulpit, which been renovated and installed at St Olave Hart Street (see image below), and its font which is at All Hallows’ Twickenham.

IMG_5579

Turn right into Fenchurch Street. Just before you pass the Paperchase shop, look down the gap between the buildings and you can just catch a glimpse of a giant sign for the Clothworkers’ livery company (you can get a much better view through the back window of Paperchase if it is open!). I have been unable to find more about why this sign is there so please comment if you know!

IMG_5547

Turn right again onto Philpott Lane passing to the right of 120 Fenchurch Street or the ‘Walkie-Talkie’. Take a brief detour into Brabant Court to see a fine early 18th century house.

IMG_5605

IMG_5606

Just before you reach Eastcheap again look carefully up at the gothic-looking building on the corner on the left. Hopefully you will spot one of London’s smallest and most intriguing public sculptures: two mice eating a piece of cheese!

IMG_5546

The mice appear to date with the building from 1862, but seem to have attracted little notice until relatively recently. Now, however they are the subject of a probably apocryphal tale linking them to to the deaths of two workers on the construction either of the building itself or of the nearby Monument. Legend has it that one of the workers, perched high up the building, found his bread and cheese missing one day, blamed his co-worker and the ensuing fight saw them both tumble to their deaths. This was then commemorated by the tiny sculpture. I have been unable to find any reference to this story prior to 1977 and so am extremely dubious of its veracity!

Cross Eastcheap and head westwards again, passing Pudding Lane and turning left into Fish Street Hill. Pause to take in the view: in the 18th century this cobbled lane, past the Monument and down to St Magnus, led down to the medieval bridge and the river.

IMG_5607

The Monument to the Great Fire of London, as it is properly known, was built in 1671-1677 by Robert Hooke, under the supervision of Sir Christopher Wren. It is 62m tall, representing the distance from its base to the site in Pudding Lane of Thomas Farriner’s bakery where the fire began.

Before ascending the Monument it is worth a circuit around the outside. Note in particular the frieze on the west face by Caius Gabriel Cibber depicting the destruction of the City, with Charles II and his brother James II giving directions for its restoration; the Latin inscription on the north face with its addition (now excised) blaming ‘Popish frenzy’ for starting the Great Fire; the plaque set in the ground to the east to Robert Hooke, the Monument’s designer; also more dragons carved on the four upper corners of the pedestal.  Almost unnoticed at the north-west corner of the base is an old fire plug marking the parish of St Margaret New Fish Street – the church that formerly stood on the site of the Monument and which was the first to be destroyed in the Great Fire.

IMG_5616

IMG_5617

IMG_5613


IMG_5618

st-margaret-new-fish-st-fire-plug.jpg

Now ascend the Monument’s 311 steps. Take time to look up and down the spiral staircase as you ascend, and look out for the (surprisingly few!) old graffiti carved on the walls.


IMG_5669

IMG_5674

When you reach the top and catch your breath, take time to admire the views. Look out for some of the City’s  finest churches: the spires of All Hallows Barking and St Dunstan-in-the-East, the tower of St Mary-at-Hill and the tower and dome of St Magnus Martyr (our next stop).

IMG_5679


IMG_5680

IMG_5676


Notice the fencing around the balcony, installed in the mid-19th century to prevent additions to the many suicides for which the Monument had become famous. For fans of Rob Lloyd’s Bloodless Boy this will again be a poignant spot!

Before descending, don’t forget to look up at the gorgeously worked golden ball of flame that tops the structure.

IMG_5678

IMG_5677


Having returned to ground, continue down Fish Street Hill and cross Lower Thames Street (ideally via the elevated Pedway bridge – another fine viewpoint) and enter St Magnus Martyr via the courtyard by the west porch. 

IMG_5686


Before entering the church, look around the courtyard for: a blue plaque noting that this was the approach to Old London Bridge; a piece of wood from the old Roman wharf on the site; some stone remnants of the old bridge; a fine set of parish boundary marks; and above your head the enormous clock bearing the date 1709.

IMG_5690

IMG_5688

IMG_5689

IMG_5692


IMG_5682


The clock was donated in 1709 by the retiring Lord Mayor, Sir Charles Duncombe, banker, Alderman of Bridge Ward and reputedly the richest commoner in England. Legend has it that as a poor apprentice crossing London Bridge on his way to work, Duncombe never knew the time and was repeatedly thrashed for lateness: his gift was therefore to prevent future apprentices from suffering the same fate. By coincidence, Duncombe’s banking business was based at the sign of the Grasshopper in Lombard Street, about which I have previously written. 

Inside, the church is a beauty.

IMG_5704
  

Although a Church of England church, St Magnus’ is Anglo-Catholic in its ministry and there is a distinctly Catholic feel to it. T S Eliot referred to St Magnus’ in The Wasteland

Beside a public bar in Lower Thames Street, 

The pleasant whining of a mandoline

And a clatter and a chatter from within

Where fishmen lounge at noon: where the walls Of Magnus Martyr hold

Inexplicable splendour of Ionian white and gold. 

The origins of its dedication are disputed. Officially it is dedicated to St Magnus-the-Martyr, Earl of Orkney (d. 1126) although there is some evidence that the dedication predates  this Magnus and may therefore refer to a Bishop of Cesarea of that name, martyred in 258 AD.

As you wander round inside, it is clear that the Viking version is preferred: 

  IMG_5696

Among many other interesting exhibits, look out especially for the fine sword rest dated 1708. This was the year of Sir Charles Duncombe’s mayoralty, and given that it bears the arms of the Goldsmiths Company I assume it was created for, or donated by, him. 
IMG_5698


For a London historian, the star attraction at St Magnus-the-Martyr is the astonishing scale model of Old London Bridge as it was c.1400, built in 1987 by David Aggett. Every aspect of life on the bridge is captured, including around 900 figures as shown in the pictures below. Look out especially for the one figure not in medieval garb: a 20th century policeman in uniform intended to represent David Aggett (a former police officer) himself!

london-bridge-model-plaque.jpg


london-bridge-model.jpg


london-bridge-model-riders.jpg


london-bridge-model-horse-cart.jpg

man-shaking-blanket.jpg

london-bridge-model-policeman.jpg


Upon leaving the church turn right on Lower Thames Street and immediately turn right behind the church towards the river. Behind the church look across the river and imagine the old bridge that began just here. On it, in front of you, on the left side of the bridge towards its centre, stood the last of Bridge Ward’s five churches: the chapel of St Thomas-the-Apostle. St Thomas’s is captured twice in St Magnus’s: once in a stained glass window and again in Mr Aggett’s model.

st-thomas-stained-glass.jpg

IMG_5694

As you return to the south bank, leave the bridge down the steps to the left under the archway of Number 1 London Bridge. Walk along the riverside walkway to the rear of the former London Bridge Hospital where you will find a plaque on the river wall commemorating the old bridge. Now walk through the hotel courtyard and return to London Bridge station via Tooley Street.


old-london-bridge-plaque.jpg


I hope you have enjoyed this post. Please take the time to add any comments, and look out for the next City of London Steeplechase! 

Practical stuff: 

Transport: the walk is designed to start and end at London Bridge station

Opening times: the walk takes in the Monument and the interior of the church of St Magnus-the-Martyr. Check the links for opening times. 

Footwear: the Monument’s spiral staircase has 311 well worn stone steps. Shoes with a good grip are recommended. 


Fishwives and Firestarters: a load of old Billingsgate

(A City of London Steeplechase, part 2)

This is my second ‘City of London Steeplechase’, a series of virtual guided walks that take in all 100 or so of the City of London’s churches, past and present, one Ward at a time. Having begun with the Tower Ward, moving clockwise to the west along the Thames our next stop is Billingsgate Ward.

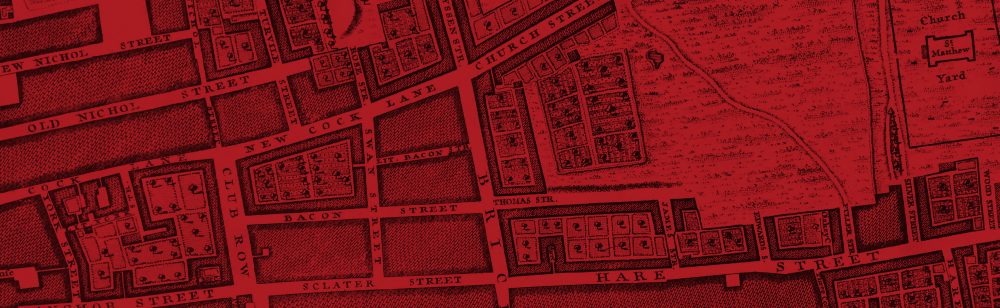
Billingsgate is a small, broadly rectangular plot of land situated between London Bridge and the Tower of London. It comprises four ancient lanes (Pudding Lane, Botolph Lane, Lovat Lane and St. Mary-at-Hill) that run northwards in parallel up a up a steep slope from the Thames as far as Eastcheap. The lanes are bisected by a number of smaller lanes and alleys running east-west, forming a rough grid pattern as shown in the maps below, from Strype’s edition of Stow’s Survey of London in 1720 and John Rocque’s map of 1746. The ward originally had five parish churches, all of which were destroyed or at least seriously damaged in the Great Fire. Three were rebuilt by Wren and two, St Margaret Pattens and St Mary-at-Hill, survive today among the City’s finest.

Billingsgate Ward from Strype, 1720


Billingsgate Ward from Rocque, 1746

Our walk begins at Monument Underground station. Leaving the station into Fish Street Hill, turn left up the hill and immediately right along Eastcheap and then right again into Pudding Lane.

As every schoolchild knows, Pudding Lane is where the Great Fire of London was started, shortly after midnight on Sunday, 2 September 1666. The exact site of the start of the fire is down at the bottom of the lane, and we’ll visit it later on in our walk. Our first destination, however, is the site of St George, Botolph Lane, one of the 15 or so Wren churches that have disappeared from London’s skyline. There is very little sign of St George’s now – not even a blue plaque – but if you look carefully as you walk down Pudding Lane to St.George’s Lane you should see an iron parish boundary marker set low down on a wall on the left hand side.

St George Botolph Lane boundary mark, Pudding Lane

Turn left into St.George’s Lane. An unprepossessing view, lined with ugly office blocks, compares poorly with what one would have seen until 1904 when St.George’s was demolished.

View east down St George’s Lane, 2015


View east down St George’s Lane before 1904


Doorway of St George Botolph Lane, St George’s Lane, shortly before demolition in 1904

At the end of St George’s Lane, cross over Botolph Lane and continue through the narrow passageway into Botolph Alley.

Half way down Botolph Alley look up on the left hand side for another parish boundary mark for St. George Botolph Lane. Notice how close you are to the tower of St Mary-at-Hill in front of you at the end of the alley – a great demonstration of how small the City’s medieval parishes were!

Parish boundary mark for St George Botolph Lane in Botolph Alley


View east along Botolph Alley to St Mary-at-Hill church (note parish boundary mark bottom left)

St Mary-at-Hill is one of the City’s lesser-known beauties. Probably originally built in the C12th, it was severely damaged but not destroyed in the Great Fire and Wren’s rebuilding made use of much of the previous structure including the north and south walls. The church escaped serious damage in the Blitz but sadly much of its fine internal furniture was damaged in a major fire in 1988 and remains in storage.

Enter through the west door from Lovat Lane and take a look round the vestibule. On your left high on the wall is a monument to one Isaac Millner – this is a relic from St George Botolph Lane, rescued when that church was demolished.

Vestibule of St Mary-at-Hill (monument from St George Botolph Lane)

Below it is a real gem: a large carved stone tablet known as a ‘Resurrection Panel’ depicting the Last Judgement. It is believed to date from the 1670s and is one of four known such works in London.

Resurrection Panel in St Mary-at-Hill vestibule


Resurrection Panel in St Mary-at-Hill (detail)

The scene is from Revelation 20.13: The sea gave up the dead which were in it; and death and Hell gave up the dead which were in them, and each person was judged according to what he had done. At the top, Christ stands triumphant with his banner, trampling Satan, while angels appear from the clouds blowing trumpets to awaken the dead. Below, coffins spew out their awakened dead. St Michael helps up one figure and guides him towards Heaven to the left and away from the gaping jaws of Hell to the right.

Note also in the vestibule some attractive wooden panelling, dated 1672 with the carved names of the churchwardens of the time.

Panellling in St Mary-at-Hill vestibule (1672)

Inside the church all is surprisingly bare apart from the beautiful domed ceiling and the organ. This is a reflection of the 1988 fire (see below); thankfully the splendid 1848 organ, considered to be one of London’s finest, has been restored to its former glory.

St Mary-at-Hill after the fire of 1988


The dome of St Mary-at-Hill


St Mary-at-Hill, east end and dome


St Mary-at-Hill, organ

Leave the church and turn right up Lovat Lane. On this narrow cobbled hill, it is easy to forget that you are in the middle of the City.

St Mary-at-Hill from Lovat Lane


Gaudi-esque windows on Lovat Lane


Old anchor sign on Lovat Lane


Old sign on Lovat Lane


Corner of Lovat Lane and Eastcheap

At the top of Lovat Lane, cross Eastcheap and turn to look back. No.16 Eastcheap, occupying the block between Botolph Lane and Lovat Lane, is the site of another disappeared church, that of St Andrew Hubbard. This church, which was destroyed in the Great Fire, has left even fewer traces than St.George Botolph. A blue plaque that adorned the site has gone, and the only signs I know of are two parish boundary markers in nearby Philpot Lane and Talbot Court.

16 Eastcheap, site of St Andrew Hubbard


Parish boundary mark for St Andrew Hubbard

Now continue eastwards along the north side of Eastcheap until you reach the next turning on the left where you will find the church of St Margaret Pattens, with its pretty little paved courtyard faced with some attractive old shop buildings.

St Margaret Pattens is first recorded as early as 1067 as a small wooden building, which was replaced in stone in the early medieval period and rebuilt again in 1538. Destroyed in the Great Fire, the church was rebuilt by Wren and completed, with its lead-covered timber spire (the only such Wren structure remaining in London) in 1702.

St Margaret Pattens with Walkie-Talkie


Round windows, St Margaret Pattens


Doorcase, St Margaret Pattens


Old shop premises, Eastcheap

Beautiful on the outside, the interior is also well worth a long look. In the vestibule is a small museum to the worshipful companies of pattenmakers and basketmakers. Among the glories inside the church are a particularly fine set  of Royal Arms (Charles II); a rare pair of canopied churchwardens’ pews (one for the church of St Gabriel Fenchurch destroyed in the Great Fire and subsumed into St Margaret’s parish); and a couple of fine sword rests. Set in the floor is a tablet to Gordon Huelin (1919-1997), former Guild Vicar of St Margarets and author of ‘Vanished Churches of the City of London‘, one of my main sources for this series of posts!

Organ and Royal Arms, St Margaret Pattens


Royal Arms, St Margaret Pattens (detail of lion)


Royal Arms, St Margaret Pattens (detail of unicorn)


Monument, St Margaret Pattens


Sword Rest, St Margaret Pattens


Exquisite carving, St Margaret Pattens


Stained Glass (Pattenmakers’ Company), St Margaret Pattens


Stained Glass (Basketmakers’ Company), St Margaret Pattens


Stine tablet to Gordon Huelin, St Margaret Pattens


Gordon Huelin


Vanished Churches of the City of London

Re-cross Eastcheap and head down St Mary-at-Hill, pausing to admire the view both down the hill, with the Shard dominant, and back up the hill to St Margaret’s. Passing down on the right you will come to the east end of St Mary’s with its lovely protruding clock, at which point you may struggle to reconcile that west and east faces are indeed of the same church, with the classical and stuccoed east end in sharp contrast to the brick tower and west face. Note also the lead rainwater pipes and the doorcase with skull & crossbones motif.

View of the Shard down St Mary-at-Hill


View of St Margaret Pattens past the St Mary-at-Hill clock


St Mary-at-Hill, clock


St Mary-at-Hill, east front


Skull & bones doorcase, St Mary-at-Hill


Skull & bones doorcase, St Mary-at-Hill (detail)


The Walkie-Talkie and St Mary-at-Hill

It is worth a brief diversion down the alleyway leading to the tiny churchyard with its pile of broken gravestones and the Victorian sign announcing the closure of the ground to further burials.

Churchyard of St Mary-at-Hill


Sign on north wall of St Mary-at-Hill


North porch of St Mary-at-Hill

Towards the bottom of the hill on the right you will see an attractive Georgian building. This is Watermens’ Hall, home of the Worshipful Company of Watermen and the only surviving Georgian livery hall in London.

Watermens’ Hall, St Mary-at-Hill


Watermens’ Hall


A Thames Waterman , wearing Doggett’s Coat & Badge

At the bottom of the hill, you will find yourself at the end of Monument Street looking up to the Monument on your right and with the former Billingsgate Market, with its distinctive Britannia statue on the roof, facing you across the busy traffic of Lower Thames Street. On this corner to your left was another wonder of London architecture that is sadly no longer with us: the old Coal Exchange. Built in 1849 in cast iron, one of the first buildings so structured, it was later described as ‘the prime city monument of the early Victorian period’ and ‘a landmark in the history of early iron construction’. Despite protests, it was demolished in 1962 to enable the widening of Lower Thames Street. Cast iron dragons which were mounted on the parapet above the entrance were preserved and were erected as boundary marks in Temple Gardens on Victoria Embankment.

Old Billingsgate, with Shard behind


Billingsgate, early morning


Britannia statue on roof of Old Billingsgate


Model for former Coal Exchange

If time permits it is worth a detour here across Lower Thames Street to explore the riverside frontage of the former Billingsgate fish market. This is the site of an ancient watergate of the City: the name Billingsgate is first recorded in Geoffrey of Monmouth’s ‘History of the Kings of Britain’ (c.1136) as the work of one Belinus, an Iron Age king in c.400BC:

In the town of Trinovantum [London] Belinus caused to be constructed a gateway of extraordinary workmanship, which in his time the citizens called Billingsgate, from his own name. … Finally, when his last day dawned and carried him away from this life, his body was cremated and the ash enclosed in a golden urn. This urn the citizens placed with extraordinary skill on the very top of the tower in Trinovantum which I have described.

Writing in 1603, Stow described Billingsgate as a busy waterside community with the quaysides thronged with all shapes and sizes of boats unloading fish, salt, oranges, onions, corn, sea coal and ale, ‘for service of the Citie, and the parts of this Realme adjoyning’. The quay had had rights to charge ships for docking since the reign of Edward III and a permanent fish market was established in 1699.

The present buildings were designed by Horace Jones in 1875 and sensitively renovated by Richard Rogers following the fish market’s relocation to Canary Wharf in 1982. It is now an entertainment and business venue, with no trace left of the chaos and noise of lorries and barrows packed with fish that were the hallmark of this area for centuries. During this time Billingsgate became synonymous for profanity and offensive language, together with the raucous street cries of the fish sellers. Writing in 1861 Henry Mayhew described the scene:

The wooden barn-looking square where the fish is sold, is soon after six o’clock crowded with shiny cord jackets and greasy caps. Everybody comes to Billingsgate in his worst clothes, and no-one knows the length of time a coat can be worn until they have been to a fish sale…over the hum of voices is heard the shouts of the salesmen who…stand on their tables, roaring out their prices…all are bawling together…till the place is a perfect Babel of competition. “Ha-a-ansome cod! best in the market! All alive! alive! alive O!” “Ye-o-o! Ye-o-o! here’s your fine Yarmouth bloaters!” …and much more.

Former Billingsgate market, south view.


Former Billingsgate market, dolphin weathervanes


Dolphin weathervane, old Billingsgate


Billingsgate porters at work looking up St Mary-at-Hill

When you have tired of Billingsgate, cross back over Lower Thames Street and head back up Monument Street towards the Monument. Stop to admire the view back up Lovat Lane:

The view back up Lovat Lane from Monument Street

At the corner of Botolph Lane on the right you will see some iron gates barring entry to what looks like a tiny garden, bearing a sign ‘One Tree Park’ (there are two!). This miserable-looking piece of ground is the only visible remnant of our last parish church for today: part of the burial ground of St Botolph Billingsgate. There were four City churches dedicated to St Botolph, a C7th English abbot who is a patron saint of travellers. These churches were sited at main entrances to the City at the four main compass points: St Botolph Aldgate to the east, St Botolph Bishopsgate to the north, St Botolph Aldersgate to the west and St Botolph Billingsgate to the south. Of the church itself there are no visible remains, though various elements have been found during archaeological excavations around the Billingsgate site.

One Tree Park

Patterned wall of St Botolph Billingsgate, uncovered during excavations at Billingsgate Lorry Park

Continue up Monument Street and turn right up Pudding Lane to return to Monument tube. As you round the corner past Faryners House, try not to miss the small and rather scruffy sign that marks the site of Thomas Faryner’s bakery where the Great Fire began.

Faryners House, Monument Street


Sign on Faryners House marking the start of the Great Fire of London in 1666

As the Museum of London puts it:

At 1am on Sunday 2 September Thomas and his family were woken by smoke. The household escaped through a window to the roof of a neighbour and raised the alarm. Thomas later said that as he had left he could see that the fire had not started near his oven. He also insisted he had extinguished the fire before going to bed and that no window or door had been open so a draught could not have re-lit the fires. He did admit that some wood had been left next to the ovens so it would be dry in the morning. Amazingly he seems to have escaped blame and returned to baking after the fire. It is now accepted that a spark or ember from his oven was probably responsible.

The rest, as they say, is history.

That completes our second City of London steeplechase!

If you have enjoyed this, I have compiled a separate Storify page here with links to relevant videos, articles and blog posts by other writers that bring further life to this part of the City of London. These include several clips on Billingsgate Market, with old footage of the market porters, some pieces about Billingsgate profanity, and (by way of contrast!) a lovely choral interlude filmed in St Mary-at-Hill. Hope you like it!